Ethernet CAT 5 UTP Cabling
Category 5 Unshielded Twisted Pair
Eight-conductor data cable (CAT 5 UTP) contains 4 pairs of wires in an unshielded plastic sheath.
Each pair consists of a solid color wire and a white and color striped
wire. Each of the pairs are twisted together. To maintain reliability
on Ethernet, you should not untwist them any more than necessary (1/2 inch maximum).
Wire thickness for CAT 5 UTP is 22 0r 24 AWG (Wire thickness is measured by gauge and represented by the unit AWG, for American Wire Gauge. The higher the gauge number, the thinner the wire.) CAT 5 UTP is capable of transmitting up to 1,000 Mbps (gigabit) when strictly installed to EIA/TIA 568 specifications (Electronics Industry Association/Telecommunications Industry Association). CAT 5 UTP is rated to 100 MHz.
Color Codes for RJ-45 Ethernet Plug
The pairs designated for 10BaseT Ethernet are orange and green. The
other two pairs, brown and blue, are unused. The connections shown
are specifically for an RJ45 plug. The wall jack may be wired in
a different sequence because the wires may be crossed inside the jack.
The jack should either come with a wiring diagram or at least designate
pin numbers that you can match up to the color code below. A punch-down tool is generally used to install wire onto a wall jack.
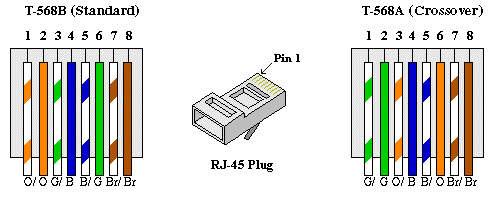
There are two wiring standards for these cables, called T-568A and T-568B.
They differ only in pin assignments, not in uses of the various colors.
The illustration above shows both standards.
Differences Between Standards
With the T-568B specification the orange and green pairs are located on
pins 1, 2 and 3, 6 respectively. The T-568A specification reverses
the orange and green connections, so that the blue and orange pairs are
on the center 4 pins, which makes it more compatible with the telco voice
connections.
T-568B is generally used as the standard CAT 5 pin-out.
Pin Number Designations
Here are the pin number designations for both standards:
T-568B
| Pin |
Color |
Pair |
Description |
| 1 |
white/orange |
2 |
TxData + |
| 2 |
orange |
2 |
TxData - |
| 3 |
white/green |
3 |
RecvData + |
| 4 |
blue |
1 |
Unused |
| 5 |
white/blue |
1 |
Unused |
| 6 |
green |
3 |
RecvData - |
| 7 |
white/brown |
4 |
Unused |
| 8 |
brown |
4 |
Unused |
T-568A
| Pin |
Color |
Pair |
Description |
| 1 |
white/green |
3 |
RecvData + |
| 2 |
green |
3 |
RecvData - |
| 3 |
white/orange |
2 |
TxData + |
| 4 |
blue |
1 |
Unused |
| 5 |
white/blue |
1 |
Unused |
| 6 |
orange |
2 |
TxData - |
| 7 |
white/brown |
4 |
Unused |
| 8 |
brown |
4 |
Unused |
Note: Odd pin numbers are always the striped wires.
Straight-Through v. Crossover
In general, the patch cords that you use with your Ethernet connections are
"straight-through," which means that pin 1 of the plug on one end is connected to
pin 1 of the plug on the other end (for either standard). The only time you cross
connections in 10BaseT is when you connect two Ethernet devices directly together
without a hub or connect two hubs together. Then you need a "Crossover" patch
cable, which crosses the transmit and receive pairs. An easy way remember how to
make a Crossover cable is to wire one end with the T-568A standard and the other
with the T-568B standard. It is a good idea to use a distinctive cable color for crossover patch cords.
Step-By-Step Wiring Instructions
- Skin off the cable jacket approximately 1" or slightly more.
- Un-twist each pair, and straighten each wire between the fingers.
- Place the wires in the order of one of the two diagrams shown above (568B or 568A). Bring all of the wires together, until they touch.
- At this point, recheck the wiring sequence with the diagram.
- Optional: Make a mark on the wires at 1/2" from the end of the cable jacket.
- Hold the grouped (and sorted) wires together tightly, between the thumb, and the forefinger.
- Cut all of the wires at a perfect 90 degree angle from the cable at 1/2" from the end of the cable jacket. This is a very critical step. If the wires are not cut straight, they may not all make contact. Use a pair of scissors for this purpose.
- Conductors should be at a straight 90 degree angle, and be 1/2" long, prior to insertion into the connector.
- Insert the wires into the connector (pins facing up, clip facing down).
- Push moderately hard to assure that all of the wires have reached the end of the connector. Be sure that the cable jacket goes into the back of the connector by about 3/16".
- Place the connector into a crimp tool, and squeeze hard so that the handle is fully closed.
- Repeat the process on the other end. For a straight through cable, use the same wiring. For a "crossover" cable, wire one end 568A, and the other end 568B.
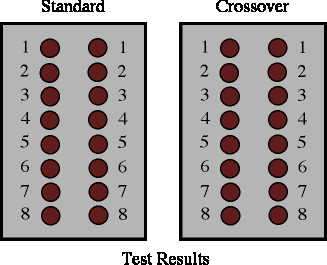
- Use a cable tester to test for proper continuity.
Note: A punch-down tool is generally used to install wire onto a wall jack. The wall jack is normally color-coded. Place un-stripped wire on the clip and press down with punch-down tool. The tool automatically puts wire in place and trims off the excess.
Common Installation Mistakes
Strict adherence to EIA/TIA 568 installation standards is essential to successful transmission at 100 Mbps over CAT 5 UTP. Because a less-than-perfect installation will probably transport 10 Mbps traffic without problem, noncompliant installations may not surface until upgrades to 100 Mbps network architectures are attempted. Among the most common installation mistakes are the following:
- Untwisting the UTP wire more than the maximum 13 mm (1/2 inch) to secure the UTP to wall plates or punch down blocks.
- Exceeding the maximum bend radius specified for UTP. Overbending the wire can cause cross-talk between stretched pairs of wire.
- Bundling the groups of UTP together too tightly with cable ties. Excessively pinching the UTP together can increase cross-talk between pairs.
This document was consolidated from various sources
Coded and validated 1-July-2001 by
Gary Girolimon. Return home.